Follow my blog with Bloglovin
Showing posts with label fall. Show all posts

Tomato Soup for the Soul

>> October 10, 2012

Seriously? Why does chicken soup get all the glory? There are few things that a piping hot bowl of tomato soup and a grilled cheese can't fix. 


Now that Fall has officially arrived in Georgia, it's finally appropriate to start pulling out the cozy sweaters, warmer recipes, and (dare I say) boots?!?! I'm super pumped that it's Fall, not only because it's my favorite season but because I love the sense of renewal that comes along with each season. Inevitably, by the time each season comes to a close we are so ready to move on that any change in temperature is cause for a mini celebration. 


These days, I've been eager for a little change in my life. With Josh graduating school, we've closed a chapter in our lives and the next chapter is waiting in the wings. Of course there's excitement that comes with new opportunities, as well as uncertainty about what's around the corner. Not to worry...before my excitement gets out of control my anxiety swoops in to make sure I don't get carried away. You know that saying "the only thing that's certain is death and taxes", well it should be "the only thing that's certain is death, taxes, and Carolyn's anxiety".


At any rate, here's to a new season and new beginnings!

Tomato Soup
Adapted from: Smitten Kitchen
1 28oz Can Whole Tomatoes
1 Tbs Brown Sugar
2 Tbs Butter
1 Large Shallot, Minced
1 Tbs Tomato Paste
1 Tbs Flour
1 Cup Chicken Broth
1/3 Cup Milk (or Cream if you'd like to add richness)


Pre-heat the oven to 450°F and line a baking sheet with aluminum foil. Set a strainer over a bowl, and cut the tomato's in half and remove the seeds. Make sure you retain as much of the juice as possible! We're just trying to get rid of those pesky seeds! Spread the tomato half's on the baking sheet and sprinkle with the brown sugar. Roast them in the oven for about 30 minutes until most of the liquid has evaporated. Pull them out of the oven and set them aside to cool.


Melt the butter of medium heat until foamy and add the tomato paste and minced shallots. Reduce the heat to low and cook the shallots for 7 - 10 minutes. Add the flour and cook until completely incorporated. Gradually start to add the chicken broth and whisk constantly until all of the broth is combined. Add the tomato juice and the roasted tomatoes and bring to a boil. Once the soup reaches a boil, reduce to a simmer and cook for about 10 minutes. 

Pour the soup into a blender (or use an immersion blender) and blend to make the soup creamy! Add the soup back to the pot and add in the milk (or cream) and cook for another 5 minutes. 


Read more...

Apple Braised Turkey Thighs

>> October 25, 2011

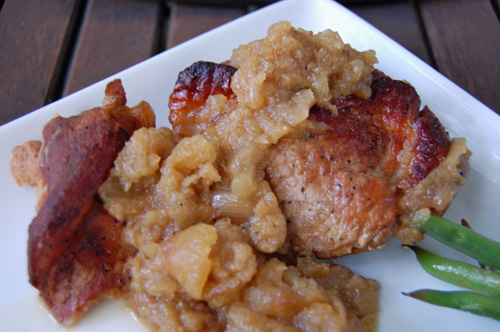
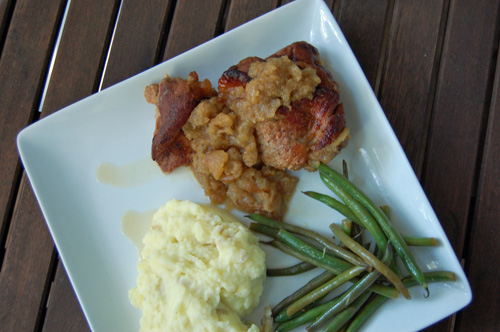
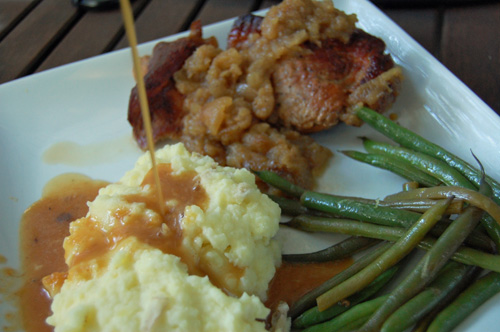
Cider Braised Turkey Thighs


We've been on apple overload lately. I keep finding ways to throw them into sweet and savory dishes because they're delicious and I have an entire bushel of them. A few weekends ago we did our annual trip to North Georgia to pick pumpkins and apples. We've been making this trip for the past several years and it's I look forward to it all year!


Cider Braised Turkey Thighs


The weather this time of the year is gorgeous, which doesn't even compare to the colors of the fall leaves in the mountains. Not to mention we have the coolest pumpkin farm on the face of the planet. The apple farm is pretty fun too, the apple season is almost over at this point so instead of picking apples off the trees we generally buy them from their store. We also buy their apple butter and the best dang candy apple I've ever tasted. For realz.


Cider Braised Turkey Thighs


Anyway - on to more important matters. This was one of those recipes that I found knew that I had to make this immediately. It's a good thing I did, this recipe is the epitome of Fall. It's super delish, crazy easy to make, and makes you want to curl up on the couch with a blanket and a book. There's nothing better!


Apple Braised Turkey Thighs
Adapted from: Martha Stewart


1 Tbs Olive Oil
2 Turkey Thighs or 2 lbs (Boneless, Skin-on)
2 Large Shallots, thinly sliced
4 Apples peeled, quartered, & cored (I used a mixture of granny smith and gala)
2 Cups Apple Cider
14.5 oz Chicken Broth
3 tsp Cider Vinegar 


Preheat the oven to 350 degrees. Heat the olive oil over medium-high heat in a dutch oven or heavy bottomed pot. Season the turkey thighs with S&P and place skin side down and cook until skin is crisp and golden and then transfer to a plate to rest (yes, just cook one side). Add shallots and cook until soft. Add apples and cook until slightly soft (about 5 minutes).


Return the turkey to the pot (skin side up) and add the cider, chicken broth and bring to a boil. Once the liquid starts to boil, cover the pot and place in the oven and cook for 1 1/2 hour. Uncover and cook for another 30 minutes.


Take the pot out of the oven and move the turkey to a plate to rest. Skim the fat from the cooking liquid or use a fat separator, and stir in the vinegar to the remaining gravy. Serve turkey with apples and gravy! Enjoy!

Read more...

Chunky Apple Muffins

>> October 9, 2011

Fall is my absolute favorite time of the year. The cooler temperatures and the beautiful colors of the leaves always seem to put an extra pep in my step! Another one of my favorite things about Fall are the flavors... cinnamon, nutmeg, pumpkin, and apples. Warm flavors that make you feel all comfy and cozy on the inside. I love being comfy and cozy on the inside. 


Last week was high time that officially kick off my fall recipes, so I started with breakfast!  Every Sunday afternoon I make my breakfast for the rest of the week because I sleep too late to do it before work every morning. What better way to start of your day, than with super awesome apple muffins that are chock full of apple chunks and cinnamon? I mean right?


Chunky Apple Muffins


Speaking of super awesome things like muffins full of apple chunks, my husband and I took a trip to Colorado during the second most amazing time of the year (second to ski season) and really got in the fall spirit. The Aspen's had begun to change colors and it was my first time being in Colorado during the Fall. It was absolutely. Freaking. Gorgeous.


Aspens(2)


This was taken in Rocky Mountain National Park as we were waiting for the shuttle bus to take us to the trailhead for our hike. The orange and red colors were so beautiful up close, but it was really amazing to see the patches of orange amongst the evergreens on the mountains.


It was truly an amazing trip - we saw some of the most beautiful views on our hike through Rockies.


NymphLake

I just love this place

RMNP


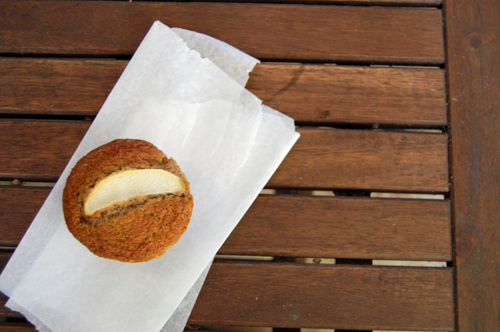
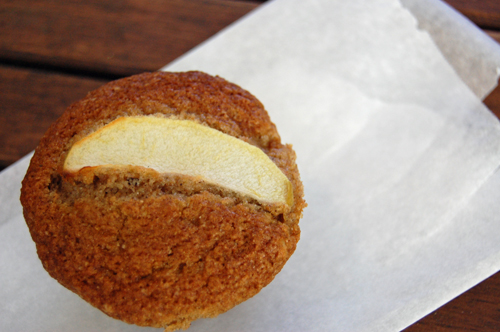
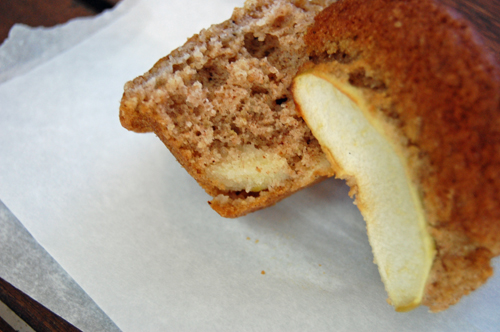
   Alrighty. back to the muffins. These were super yummy and I health-a-fied them a little by swapping half of the AP (all-purpose) flour for whole wheat. The greatest surprise was the apple slice on top, while baking the apple sort of dehydrates and adds this lovely chewiness to the muffins' overall texture.
Chunky Apple Muffins


Oh, and did I mention that it was chock full of apple? Delish.


Chunky Apple Muffins

Adapted From: Martha Stewart

Cooking Spray
1 Granny Smith Apple, peeled, cored, and quartered
1 Cup Sugar
1 Cup All-Purpose Flour
1 Cup Whole Wheat Flour
2 teaspoons Baking Soda
1/2 teaspoon plus 2 pinches Salt
1 teaspoon Cinnamon
1/4 Cup Chopped Walnuts, toasted
2 Large Eggs
1 Cup Buttermilk, room temperature
1/2 Cup Unsalted Butter, melted

Preheat oven to 400 degrees. Spray a 12-cup standard muffin tin with cooking spray and set aside. Cut 2 apple quarters into a 1/4-inch dice and cut the remaining quarter into 12 thin slices.

Whisk together sugar, flour, baking soda, salt, and cinnamon in a medium bowl. Add diced apple and walnuts and toss to coat. Whisk together eggs, buttermilk, and butter in a separate bowl. Fold the buttermilk mixture into the flour mixture until just combined. Don't over mix, but make sure the dry ingredients are completely incorporated. The batter will be very thick. Spoon the batter among the muffin cups, and fill each cup about three-quarters of the way full. Top each cup with an apple slice.

Bake until the muffins are brown around the edges and spring back when touched 16 - 18 minutes (mine took 16). Let muffins cool slightly for about 5 minutes, and then completely cool on a wire rack.

The muffins last about a week when kept in an airtight container.

Read more...

Pumpkin Whoopie Pies

>> October 11, 2010

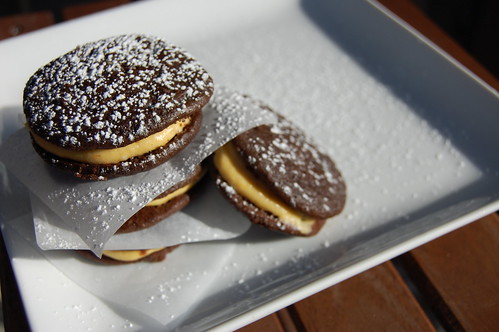
Whoopie Pie


I swear it will never come (let’s all forget what I said last week). Fall is trying to elude us all…at least here in the South. Fall evokes different feelings for everyone. Some linger in the excitement of college football, some watch for changing colors and falling leaves, people like myself anticipate the new bounty that awaits us at the markets every week. The common ground that we all share is the enthusiasm for cooler temperatures! Georgia weather has been taunting its inhabitants for going on two weeks. It’s hot, then it’s cold, it’s hot, then it’s cold. Sheesh! Can I say enough already?

Pumpkins!


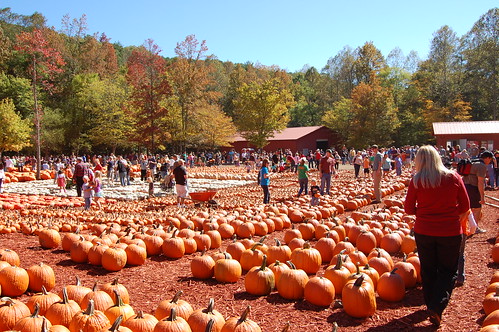
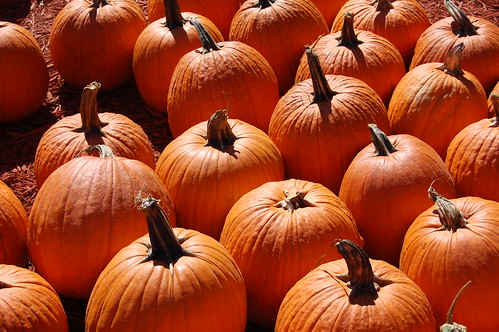
I wasn’t about to let the too high temperature, and by too high I mean 85 (which relative to the 100+ heat we saw this summer isn’t too bad) keep me away from the mountains of North Georgia and the masses of pumpkins that were ripe for the picking.

Pumpkins!


I love these little seasonal daytrips that we take. There’s nothing like scooting away to what seems like an entirely different state for a few hours to stretch our legs and breathe in the open air. The bonus for me is that I get to be the passenger and gaze at all of the foliage and the old vintage houses that sit along the state road the leads us up into the mountains.

Pumpkins!


Of course the very first thing one must do upon returning from such a trip is to immediately begin preparing the loot for the first delicacy of the season. Ok – I guess second after arranging the soon-to-be jack-o-lantern’s at the front door for all to be envious.

Whoopie Pie


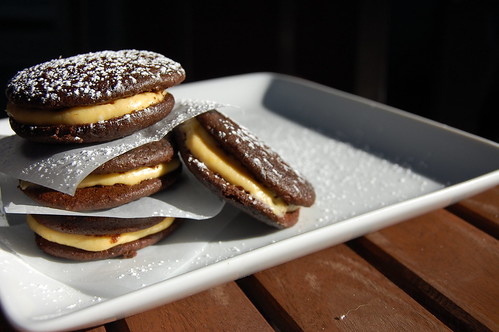
My first pumpkin adventure of the season was to be pumpkin whoopie pies (actually made from store bought pumpkin bc we were home bound last week) because I could think of no better way to usher in the new season than with a cookie, that’s really a sandwich, that tastes like cake. It all makes perfect sense.

Whoopie Pie


Pumpkin Whoopie Pies
Martha Stewart

For the cookies
1 ¾ cups all-purpose flour
¾ cup unsweetened cocoa powder (not Dutch-process)
1 ½ tsp baking soda
½ tsp coarse salt
1 tbs unsalted butter, softened
¼ cup vegetable shortening
½ cup granulated sugar
½ cup packed dark-brown sugar
1 egg
1 cup milk
1 tsp pure vanilla extract

For the filling
4 oz cream cheese, at room temperature
½ cup (1 stick) unsalted butter, at room temperature
½ cup confectioners' sugar
¼ cup canned solid pack pumpkin
Pinch of cinnamon
Pinch of nutmeg

Prepare cookies: Preheat oven to 375 degrees. Sift together flour, cocoa powder, baking soda, and salt into a medium bowl; set aside.

Place butter, shortening, and sugars into the bowl of an electric mixer fitted with the paddle attachment. Mix on high speed until smooth, about 3 minutes. Add egg; mix until pale and fluffy, about 2 minutes. Mix in half the flour mixture, then the milk and vanilla. Mix in remaining flour mixture.

Drop about 2 teaspoons dough onto baking sheets lined with parchment paper, spacing 2 inches apart. Bake until cookies spring back when lightly touched, 12 to 14 minutes. Transfer baking sheets to wire racks and let cool 10 minutes. Remove cookies from baking sheets and transfer to wire racks using a spatula; let cool completely.

Prepare filling: In the bowl of a mixer fitted with the paddle attachment, whip together cream cheese, butter and confectioners' sugar on medium speed until smooth, about 3 minutes. Add pumpkin, cinnamon, and nutmeg; whip until smooth, scraping down the bowl as necessary.

Pipe or spoon about 2 teaspoons filling on the flat sides of half the cookies. Sandwich with remaining cookies, keeping the flat sides down.


Read more...

Hearty Chicken + Rice Soup

>> October 3, 2010

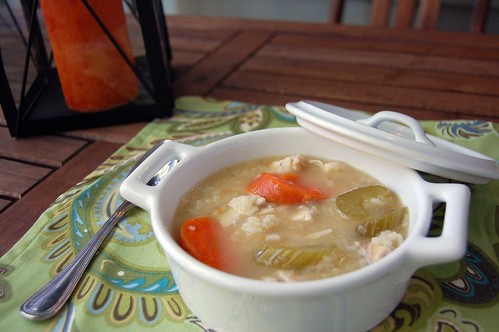
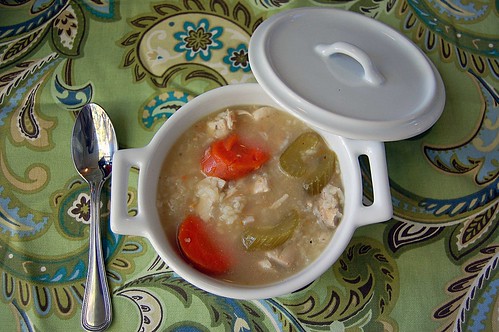
Hearty Chicken + Rice Soup


It’s finally fall! I’ve been dreaming of the beginnings of my favorite season when we began suffering 100+ degree weather combined with 100% humidity. It’s been a long time coming, and it’s finally here!

Autumn is my favorite season because of all of the beautiful foliage, hearty and warming meals, turtleneck sweaters, and let’s not forget…pumpkins! I’m so excited to decorate with fall colors, visit my favorite
pumpkin patch to pick out the perfect pumpkin, and drive through the apple orchards of North Georgia in search for the best candy apples ever invented!

With less than a week of lower temperatures under our belt, Josh has already succumbed to this year’s first flu and has been lying around the house for the past four days like a sad little mushroom. Unfortunately this has put a damper on our original plans to tromp through the North Georgia mountains – but not to worry, it’s already back on the calendar for next weekend!

Hearty Chicken + Rice Soup


Since Josh’s diet has consisted of jello cups and sprite for the past several days, I decided that it was high time for some real nutrition. After scouring the interwebs for a soothing soup, I settled on this chicken and rice soup. It’s simple enough, and I was actually surprised at how quickly it came together. I altered the original recipe slightly – and in my opinion for the better, but you judge for yourself!

Hearty Chicken + Rice Soup
Adapted from Bon Appetit circa 2000 via
Epicurious

6 cups of Chicken Broth
2 cups of Water
2 split Chicken Breasts (bone-in, skin-on)
2 whole Chicken Leg quarters (skin-on)
1 ½ Tbs Olive Oil
3 Carrots, sliced on the diagonal into ½ inch pieces (scrubbed, not peeled)
3 Celery Stalks, sliced on the diagonal into ½ inch pieces
1 Yellow Onion, diced
1 Bay Leaf

1 ½ cups uncooked long-grain white rice, rinsed*

Heat the Olive Oil in a large stock pot over medium high heat, and brown the chicken breasts (skin side down first) for three to four minutes on each side and set aside. Follow with browning the leg quarters (skin side down first) for three to four minutes on each side and set aside with the breasts.

While the chicken is browning, slice the Carrots, Celery, and Onion. After you’ve browned the chicken, add in the vegetables and cook over medium high heat for four to five minutes or until the onions are soft. While the vegetables are cooking, remove the skin and any excess fat from the chicken.

Once the Onions have softened, add the chicken back to the pot along with the Chicken Broth, Water, and Bay Leaf. Bring to a boil, and then simmer for 30 to 40 minutes until the chicken is cooked through. Every so often, check the soup and skim any foam that has accumulated on the top. Once the chicken is cooked through, remove and set aside to cool.

**This step can be skipped if you’re on a time crunch:
After the chicken has cooked through, turn off the heat and allow the soup to cool at room temperature. Place the entire pot into the refrigerator and cool the soup to the point that the fat solidifies on the top, remove the fat from the top of the soup and place over medium heat and bring back to a simmer.

Remove two cups of the stock and place in a medium saucepan, and bring to a boil. When at a boil, add in the rice and turn the heat down to a simmer. Stirring occasionally, cook the rice until tender (approx 15 – 20 min) and add back to the soup.

While the rice is cooking, pull the chicken from the bones and shred or slice into chunks according to your preference.

After the rice has cooked through, add the chicken and the rice back to the main pot with the vegetables.

Serve. And Enjoy!

**I suppose that you could use any rice, I used short grain because it’s what I had on hand.

Read more...

  © Blogger template Simple n' Sweet by Ourblogtemplates.com 2009

Back to TOP